Projects › Midtown West › 516 West 47th Street
Completed project · Midtown West, New York, NY
A kitchen and primary bathroom in Midtown West, both rebuilt in place, plus 400 square feet of original hardwood sanded and refinished rather than replaced. The bathroom is a tub-to-tub renovation tiled to the ceiling, and every kitchen appliance got its own 20 amp circuit.

Job record
- Location
- Midtown West, New York, NY 10036
- Building
- 516 West 47th Street
- Scope
- Kitchen, primary bathroom and 400 square feet of floor refinishing
- Bathroom
- Tub to tub, tiled to ceiling, wall-hung vanity
- Kept
- The hardwood floors, refinished rather than replaced
- Completed
- 2021
What came out
In the kitchen: the wall and base cabinets, the countertops, the backsplash, the sink and all its hardware, the ceiling light fixture and every appliance. In the bathroom: floor tile, wall tile, the radiant heated floor, the shower body, the toilet, the tub and its filler, the faucets, the vanity, the medicine cabinet, the vanity recessed lights and the accessories.
One thing was deliberately not removed. The scope says it twice, once under the kitchen and once under flooring: keeping the hardwood floors. They were protected through the demolition and refinished at the end, which is a different job with different risks and was priced as one.
What the crew did, in order
Keep the floor, protect it, come back to it
The hardwood stayed down through both rooms. At the end, 400 square feet of it was refinished: surrounding areas sealed off and every door taped with plastic drop cloths so wood dust could not travel, then sanding up to three times with a heavy-duty dustless sander through progressively finer grades, edges done with an edge machine, hand scraping where a machine could not reach.
Finish it in water-based polyurethane
Wood filler where it was needed, buffing up to three times through progressively finer plastic screens, stain if required, then a water-based protective sealer and three coats of water-based polyurethane. Water-based matters in an occupied apartment: it is lower odor and faster to return to than an oil-based finish.
Give every kitchen appliance its own circuit
The electrical scope is explicit: a separate 20 amp circuit for each appliance, with all circuits GFI and GFCI outlets to New York City code. Two new GFCI outlets went into the backsplash in their existing positions, the kitchen light switch and ceiling light went back on their existing points, and under-cabinet lighting was added.
Run copper for the ice maker
The refrigerator being installed had an ice maker and the kitchen had no water line for one. A new line was run in copper tubing, which is what code asks for, and connected at the existing refrigerator position.
Build a bar where there was a gap
Cabinets were carried to the right of the oven to create a bar area, on plywood substrate installed first to anchor and support the wall runs. The countertop was templated on site and carried across every surface including the island, with crown and baseboard molding where the design needed it.
Take the bathroom back to the studs and tile to the ceiling
The subfloor was prepared, then a Laticrete 9235 membrane laid across the entire bathroom floor and lapped a minimum of twelve inches up the walls. The walls were resurfaced for moisture durability and a Laticrete 9234 membrane applied across the whole wet shower wall. Tile then ran to ceiling height throughout the room rather than stopping at the shower.
Decide the medicine cabinet after opening the wall
Whether the medicine cabinet could be recessed or would have to be surface mounted was written as a decision to make after demolition, not before. A twelve by twelve niche was framed into the shower wall and two shelves added. The popcorn ceiling was removed while the room was open.
The kitchen
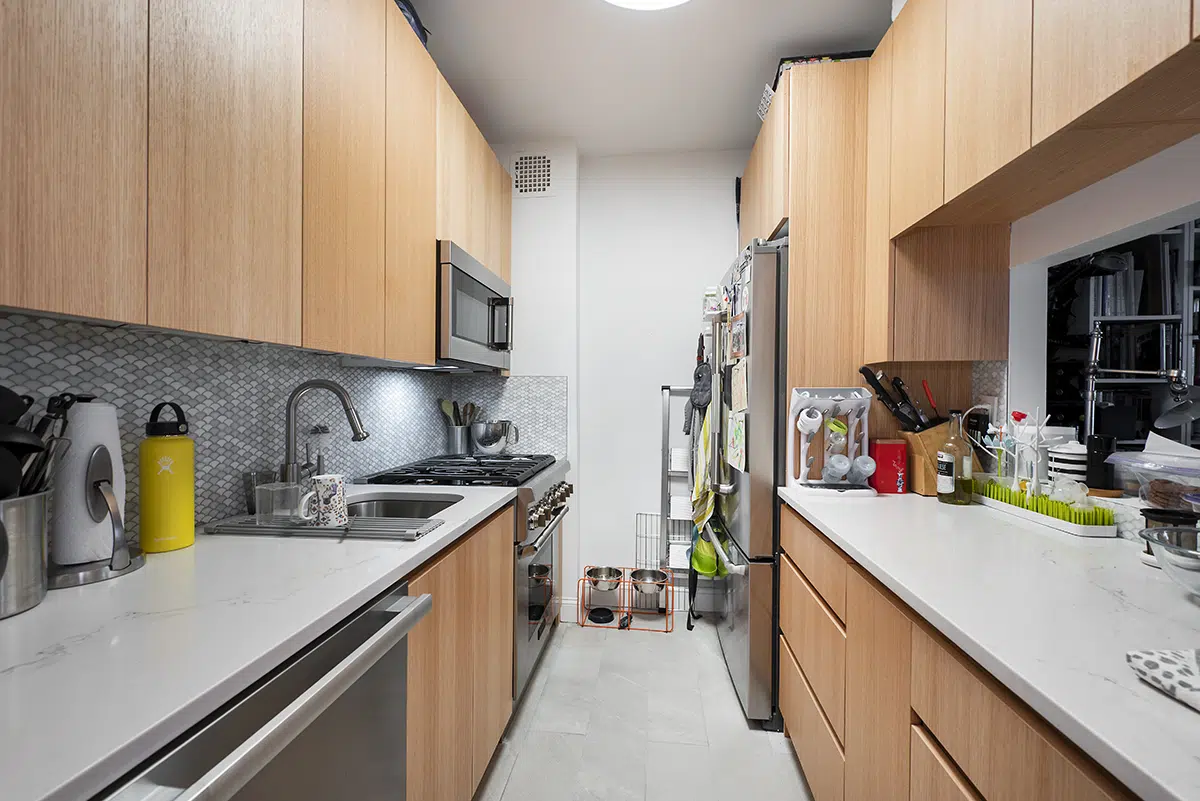
Dark wood slab cabinets under a pale linear backsplash, with a continuous strip of under-cabinet light running the length of the counter. The layout did not change: sink, range, dishwasher and refrigerator all went back where their predecessors had been, which is what kept the plumbing and the gas connection simple.


The counter is a single specification carried across the run and the island, templated on site after the cabinets were set and their tops smoothed. The undermount sink sits in it without a rim, and the microwave went above the range on the existing outlet.


The bathroom
This is a tub-to-tub renovation, which is worth naming because the alternative was available and not taken. The old tub, its filler and the shower body came out and a new tub went into the same position, behind a glass enclosure, with a new shower body and handheld.


The vanity is wall-hung, so the floor tile runs continuously beneath it, and it was noted in the scope as carrying an additional labor cost for exactly that reason. The toilet is a comfort-height tank model in the same position as the one it replaced. Five recessed lights went back in their existing locations and two switches were replaced in place.


Tile runs to the ceiling through the whole room, not only in the wet area. Sealant was specified on all marble and stone tile where required, and the one GFCI outlet was reinstalled in its original position but rotated to vertical.


Materials and finishes
Bathroom construction
| Element | Specification |
|---|---|
| Floor waterproofing | Laticrete 9235 across the entire floor, lapped a minimum of 12 in up the walls |
| Shower wall waterproofing | Laticrete 9234 across the entire wet shower wall |
| Wall preparation | Walls resurfaced for increased moisture durability before tiling |
| Wall tile | Run to ceiling height throughout the room |
| Recessed niche | 12 x 12 in |
| Shelves | Two, positioned to the design |
| Tub | New tub and drain in the existing position |
| Toilet | Comfort height tank model, existing rough-in |
| Vanity | Wall-hung, with new faucet and sink in the same location |
| Stone sealant | Applied to all marble and stone tile where required |
| Ceiling | Popcorn finish removed |
Bathroom services
| Element | Specification |
|---|---|
| Recessed lights | Five, reinstalled in their existing locations |
| Light switches | Two, replaced in the same locations |
| GFCI outlet | One, same location, reoriented from horizontal to vertical |
| Shut-off valves | New hot and cold |
| Shower | New shower body with handheld, existing position |
Kitchen
| Element | Specification |
|---|---|
| Appliance circuits | Separate 20 amp circuit per appliance, all GFI and GFCI to NYC code |
| Backsplash outlets | Two new GFCI in their existing positions |
| Ice maker supply | New copper tubing water line to the refrigerator position |
| Cabinet support | Plywood substrate installed to anchor and support the wall cabinets |
| Bar area | New cabinets to the right of the oven |
| Countertop | Templated on site, carried across all surfaces including the island |
| Under-cabinet lighting | Installed along the counter run |
| Vent | New cover fitted |
| Flooring | Existing hardwood retained |
Floor refinishing
| Element | Specification |
|---|---|
| Area | 400 sq ft |
| Dust control | Surrounding areas sealed, all doors taped with plastic drop cloths |
| Sanding | Up to three passes, heavy-duty dustless sander, progressively finer grades |
| Edges | Edge machine, with hand scraping where required |
| Buffing | Up to three passes through progressively finer plastic screens |
| Filler | Wood filler or putty where needed |
| Stain | Minwax, where required |
| Finish | Water-based sealer plus three coats of water-based polyurethane |
The result
More MyHome projects in Manhattan
Questions this project answers
Should I replace my hardwood floors during a renovation, or can they be saved?
Often they can be saved, and on this job they were. The scope says twice that the hardwood is being kept, once under the kitchen and once under flooring, so the floor was protected through demolition and then refinished as a separate piece of work at the end: 400 square feet sanded up to three times with a dustless machine, edged, hand-scraped where needed, buffed, then sealed and given three coats of water-based polyurethane. Refinishing is usually far cheaper than replacement and keeps a floor that cannot be bought new. The catch is sequencing: it has to happen after the dusty trades, and the apartment has to be empty while it cures.
My apartment trips a breaker whenever I use two appliances. Can that be fixed in a renovation?
Yes, and this scope is a good model for how to ask for it. It does not say “upgrade the electrical”. It says a separate 20 amp circuit for each appliance, with all circuits GFI and GFCI outlets to New York City code. That is a specification a contractor can be held to and an inspector can check. Vague electrical language is where these jobs go wrong, because “new outlets” and “new circuits” cost very different amounts and only one of them stops the breaker tripping.
What are change orders, and how do I avoid being overcharged by my contractor?
A change order is a written amendment to what was agreed, and the best defence is a scope that says out loud what it cannot yet know. This one does it repeatedly. Whether the medicine cabinet could be recessed or would need surface mounting is written as a decision to be made after demolition. Any electrical components inside that cabinet are flagged as additional labor. Wall-mounting the vanity carries a stated additional cost. Converting the over-mirror fixture to sconces is noted as possibly costing more. None of those could arrive as a surprise, because all of them were surprises the scope had already named.
Should I tile my bathroom to the ceiling or stop partway up?
This one went to the ceiling throughout, not just inside the shower, and the waterproofing went further than most: a membrane across the entire floor lapped a minimum of twelve inches up the walls, and a second membrane across the whole wet shower wall. Full-height tile costs more in material and labor and it removes the paint line that shows every splash and every year of steam. In a bathroom with no window it is usually the right call.
How do I protect my building’s hallways and keep my neighbors happy during a renovation?
Dust is the part neighbours actually experience, and floor sanding is the worst of it. On this job the refinishing scope begins with sealing off the surrounding areas and taping every door with plastic drop cloths before a sander is switched on, then specifies a dustless machine rather than an ordinary one. Inside the apartment the kitchen work began with protecting valuable objects, covering floors in the surrounding rooms and moving obstacles out. Ask to see those lines in writing; they are cheap to promise and obvious when skipped.