Projects › Upper East Side › 529 East 84th Street
Completed project · Upper East Side, New York, NY
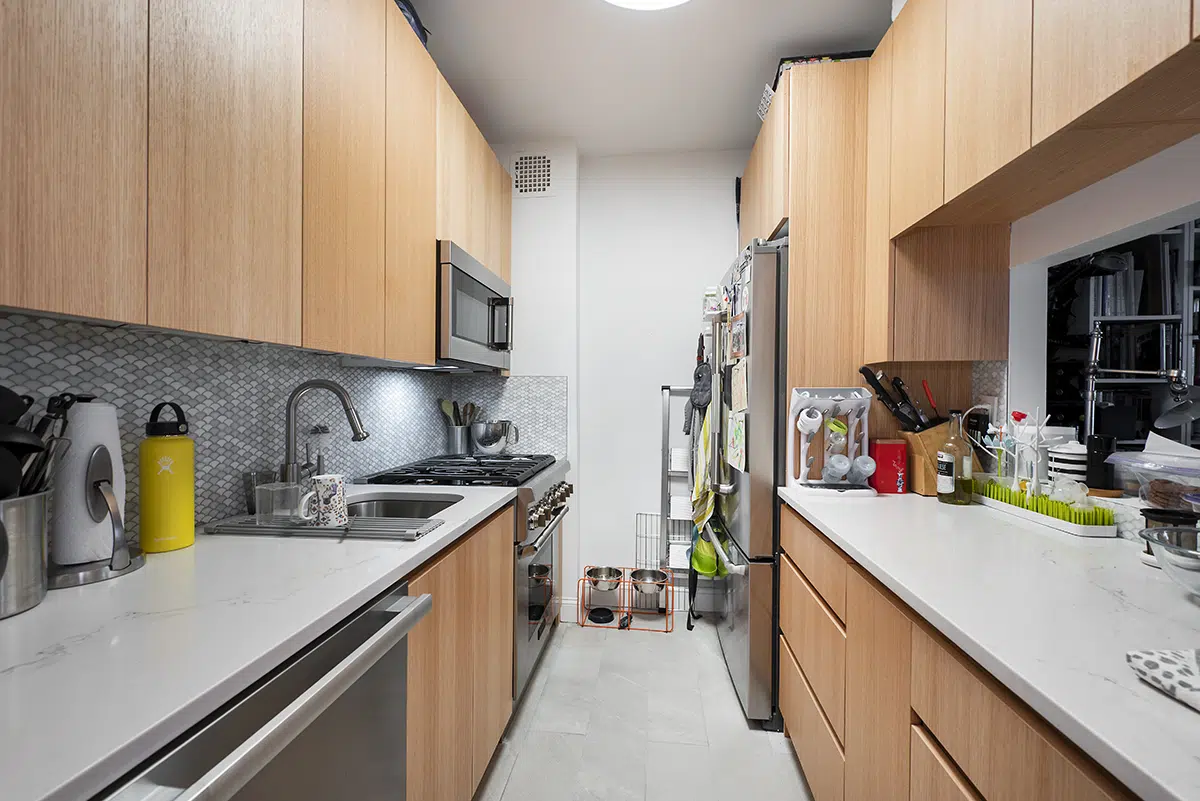
A galley kitchen barely wider than its range, rebuilt in sage green from floor to ceiling with four 24 inch appliances, a hidden plug mold instead of backsplash outlets, and the apartment electrical panel moved up to three feet to make the run work. Scoped at four to six weeks.

Job record
- Location
- Upper East Side, New York, NY 10028
- Building
- 529 East 84th Street
- Scope
- Kitchen renovation and electrical panel relocation
- Duration
- 4 to 6 weeks
- Appliances
- Thor Kitchen range, Liebherr refrigerator, Bosch dishwasher, Bertazzoni microwave
- Cabinets
- Sage Green, slab front, ceiling height
- Completed
- 2023
The kitchen before the work
A closed galley behind a doorway, with white wall cabinets, a yellow laminate counter and a two-ring cooktop where a range should be. Storage was one shallow run of uppers. The plaster around the window had failed.


Nothing about the room was going to be solved by replacing doors. The counter, the cabinets, the appliances, the backsplash, the floor tile and its saddle and the ceiling light all came out, and the walls were made good before anything new went near them.


What the crew did, in order
Strip the room and waterproof the floor
Wall and base cabinets, countertops, sink and hardware, the refrigerator and range, the tiled backsplash, the ceiling lighting, and the floor tile and saddle all came out. A waterproofing membrane then went across the kitchen floor and eight inches up the walls before any tile was laid.
Move the electrical panel
The apartment panel was replaced with a new one in a new position, relocated up to three feet. From there a line was run for the new range hood, another was pulled from a nearby source for the range outlet, and the existing backsplash outlet on the sink side was relocated to the plan.
Wire the whole kitchen for low voltage
Under-cabinet lighting was put on its own new switch, with the entire kitchen wired in low voltage for LED. Two recessed under-cabinet lights were set at the entry end. The overhead light was replaced in its existing position and the switches and outlets were replaced with GFCI.
Hide the power behind a panel
Rather than punching outlets through a new backsplash, a plug mold was run along the back of the bottom panel beneath the wall cabinets. A three quarter inch panel was fitted under the cabinets, notched to take both the under-cabinet lighting and the plug mold. It is the reason the tiled wall in these photographs is uninterrupted.
Fit cabinets to a 102 inch ceiling
Plywood substrate went in first to anchor and support the wall cabinets, then the run itself in Sage Green: wall end panels with three inch returns, filler overlays, and a wall cabinet with a lift-up door. Doors are 44 and three quarter inches high, extending past the bottom panel, and toe kick molding closes the base.
Template the counter, then tile to it
The countertop was templated on site for a precise fit, the cabinet tops smoothed first. Then the backsplash, with every exposed tile edge and corner finished in a glass liner five eighths of an inch high by seven sixteenths deep.
Make the baseboard out of the floor
Instead of a timber skirting, a four and a half inch baseboard was cut from the floor tile itself and its exposed edge painted to match. In a galley this narrow it keeps the floor and the base of the wall reading as one surface.
Paint, seal and hand it back clean
Painting was included, skim coating was not, and the preparation is most of the work: sealing the areas that needed it, covering floors in the surrounding rooms, and taking off or protecting hardware rather than cutting around it. Floor tile was grouted and sealed where sealer was needed, and the working area was cleaned before handover.
The finished kitchen
Four appliances, all of them 24 inches or less, which is what a galley this width allows. A Thor Kitchen LRG2401U slide-in natural gas range with four burners running 18,000, 12,000, 9,000 and 3,500 BTU over a 3.7 cubic foot oven. A Liebherr CS1321 counter-depth bottom-freezer refrigerator at 24 inches. A Bertazzoni Professional over-the-range microwave at 1.4 cubic feet. A Bosch 800 Series dishwasher, full console, at 18 inches.


The range is the piece worth noting. An 18,000 BTU front-left burner in a 24 inch slide-in is unusual, and it is the difference between a kitchen that can hold a pan at heat and one that cannot. The oven is bake and broil only, no convection, at 12,000 and 10,000 BTU respectively, with two chrome racks over five positions.


The sink and faucet went back on the existing rough-in, so no drainage moved. The range likewise reconnected to the existing gas rough-in. What changed is everything above and around them: the cabinetry, the counter, the ribbed backsplash, the floor, and the lighting.
Two decisions on the counter are worth spelling out, because they are the sort of thing a scope offers as a choice and most people never get asked about. The first is how the counter meets the wall: a four inch lip backsplash in the same material, a full eighteen inch run of it, or nothing, with tile taken down to the counter instead. The second is whether the sink is mounted over or under. This kitchen took the tile down to the counter and undermounted the sink, which is why there is no stone upstand interrupting the ribbed wall and nothing to catch a cloth on at the sink edge.

Materials and finishes
Appliances
| Element | Specification |
|---|---|
| Gas range | Thor Kitchen LRG2401U slide-in, 24 in, natural gas or LP convertible, 120V, 15A |
| Range burners | 18,000, 12,000, 9,000 and 3,500 BTU |
| Oven | 3.7 cu ft, bake 12,000 BTU and broil 10,000 BTU, two chrome racks, five positions |
| Refrigerator | Liebherr CS1321 counter depth bottom freezer, 24 in |
| Over-the-range microwave | Bertazzoni Professional KOTR24MXE, 1.4 cu ft |
| Dishwasher | Bosch 800 Series SPE68B55UC, full console built in, 18 in |
Cabinetry and finishes
| Element | Specification |
|---|---|
| Cabinets | Slab front in Sage Green, ceiling height |
| Cabinet doors | 44.75 in high, extending past the bottom panel |
| Wall end panels | 3 in returns, with filler overlays and a lift-up wall cabinet |
| Cabinet support | Plywood substrate installed to anchor the wall cabinets |
| Under-cabinet panel | 3/4 in, notched for the lighting and the plug mold |
| Tile edging | Glass liner, 5/8 in high by 7/16 in deep, to all exposed edges and corners |
| Baseboard | Floor tile cut to 4.5 in high with the edge painted to match |
| Toe kick | Molding to the base cabinet run |
| Ceiling height | 102 in |
Services
| Element | Specification |
|---|---|
| Electrical panel | Replaced and relocated up to 3 ft |
| Range hood supply | New line run from the new panel |
| Range outlet | New line from a nearby source |
| Backsplash outlet | Existing outlet on the sink side relocated to plan |
| Under-cabinet lighting | Low voltage throughout, on a new dedicated switch |
| Recessed lights | Two, under cabinet, at the entry end |
| Power distribution | Plug mold concealed behind the under-cabinet panel |
| Floor waterproofing | Membrane to the kitchen floor and 8 in up the walls |
| Sink and range connections | Both reused their existing rough-ins |
The result
More MyHome projects in Manhattan
Questions this project answers
How long does a kitchen remodel take in a NYC apartment?
This one was scoped at four to six weeks, and it is a useful benchmark because almost nothing moved. The sink and the range both reconnected to their existing rough-ins, so there was no plumbing relocation and no gas shutdown to schedule. What did take time was the electrical: a new panel in a new position, a new line for the hood, another for the range outlet, and the whole room rewired in low voltage for the lighting. If a quote for a galley kitchen says two weeks, ask what is being left in place.
My NYC apartment kitchen is original to the building and feels cramped. What are my options?
Before moving any walls, look at what the appliances are costing you in width. This kitchen kept its exact footprint and still went from a two-ring cooktop to a full four-burner range with a 3.7 cubic foot oven, because every appliance chosen was 24 inches or under. Cabinets then ran to a 102 inch ceiling rather than stopping at eight feet, which roughly doubled the storage without taking a square inch of floor. Height and appliance width are usually available long before wall removal is.
Can I avoid having electrical outlets in my new backsplash?
Often, yes, and it is worth asking for. On this job a plug mold was run along the back of a panel fitted under the wall cabinets, notched to carry both the power and the under-cabinet lighting. Counter appliances plug in underneath the wall units instead of into the wall behind them. The result is a tiled backsplash with no outlets or plates breaking it up, which matters a great deal when the tile is the one decorative move in the room. Confirm it against your local code and your inspector before specifying it.
My apartment trips a breaker whenever I use two appliances. Can that be fixed in a renovation?
Yes, and this job did it as a defined piece of work rather than an afterthought. The apartment panel was replaced with a new one and relocated up to three feet, then separate lines were run from it for the range hood and the range outlet, with the existing backsplash outlet moved to suit the new layout. Panel work is disruptive and involves the building, so it is far cheaper to do while the kitchen is already stripped than to come back for it later.
What are change orders, and how do I avoid being overcharged by my contractor?
A change order is a written amendment to what was agreed. The defence is a scope that separates what is included from what is not, in writing, before you sign. This one does: installing a new water line to the refrigerator is listed as an option with the reason given, that current code requires copper lines with an air gap and a mounting box. Removing the kitchen closet and cabinetting that area is listed as an option. Adding a dishwasher, including its new line from the panel, is listed as an option. Painting is included but skim coating is explicitly excluded. None of those could arrive later as a surprise.